

23 May Weekend Project: Building A Herb Garden
A couple weeks ago, when my husband planted the garden, we purchased some herbs for me to plant. We ended up not having any room in our garden, so I had to find another spot around that yard to plant my herbs. After procrastinating for weeks, I finally decided to get this task done this weekend. Really I was forced into it, my oregano already died in the pot and the basil wasn’t too far behind.
After searching around the yard, I settled on a spot on the backside of our house that faces South. We have future plans of landscaping around the entire perimeter of the house, so I wanted to incorporate this garden with future landscaping plans. This is the spot I chose:
.JPG) I know, the air conditioner is ugly right?!? One idea for landscaping around the house is to hide the air conditioner with some sort of large shrub. I had to keep this idea in mind while I was laying out the garden. I searched around on the internet and found this picture of some one’s herb garden layout. I really liked the plan, but my space is not as big as the picture so it has been modified a lot.
I know, the air conditioner is ugly right?!? One idea for landscaping around the house is to hide the air conditioner with some sort of large shrub. I had to keep this idea in mind while I was laying out the garden. I searched around on the internet and found this picture of some one’s herb garden layout. I really liked the plan, but my space is not as big as the picture so it has been modified a lot.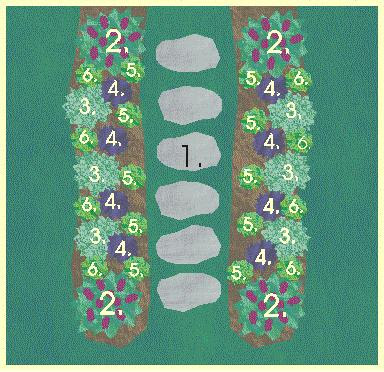 To start the garden, the first step is to remove the grass. This is a very tiring step. It involves some muscle, sweat, and determination. Get ready to get dirty and take out a bunch of earthworms in the process. I almost name this blog “Friendly Fire” due to the millions of earthworms that lost their lives in this quest of mine. I saved as many as I could, but some of them got in the way.
Here are the tools I used to get this part done: spade, hand trowel, lawn edger, and a dandelion weeder. (In order from left to right.).JPG) Ok, I know what you are thinking, ‘What does a dandelion weeder have to do with this project?’ Well, when it comes to removing grass, it is a miracle tool! I use the blade to stab right below the root line of the grass and it allows me to roll up the grass as I remove it. Really, it is the best tool for removing grass. I took a picture of how I use it.
Ok, I know what you are thinking, ‘What does a dandelion weeder have to do with this project?’ Well, when it comes to removing grass, it is a miracle tool! I use the blade to stab right below the root line of the grass and it allows me to roll up the grass as I remove it. Really, it is the best tool for removing grass. I took a picture of how I use it. .JPG) I removed all the grass from a 10′ x 42″ section. After all the grass was removed, I proceeded to dig a ditch. The ditch stops the grass from spreading into the bed. The ditch is about 4 inches deep and 2 inches wide. It is not necessary to add in a ditch if you are putting in an edging of some sort.
I removed all the grass from a 10′ x 42″ section. After all the grass was removed, I proceeded to dig a ditch. The ditch stops the grass from spreading into the bed. The ditch is about 4 inches deep and 2 inches wide. It is not necessary to add in a ditch if you are putting in an edging of some sort..JPG) After the ditch was ready, it was finally time to plant all the plants! WooHoo!!
After the ditch was ready, it was finally time to plant all the plants! WooHoo!!
I chose the following plants:
Nanho Purple Butterfly Bush
Dill
Sweet Basil
Rosemary
Italian Parsley
Oregano
Chives
Parsley
On each side of the garden is the Nanho Purple Butterfly Bush. This plant is nice because it attracts butterflies and can grow up to 4’x4’…which is perfect for covering up the air conditioner!
Against the house I planted two dill plants, three sweet basil, and two rosemary plants.
In the front of the bed I planted one of each of the following herbs: italian parsley, oregano, chives, and cilantro.
To finish it all off, I made these very cute, little copper labels for the herbs. I found the copper labels at Target last year in packs of 4 in the $1 section. It came with a black marker to write names on them, but I wanted a more permanent label. I used an old pottery tool (it looks like a long pin) to poke the names through the copper. With time, they should develop that pretty, green copper look.
 Finally my herb garden was finished. It was so nice looking, but just so plain around the edges. I decided to go digging through our pile of leftover landscaping items from last year. To my luck I found some retaining wall topper blocks. I laid them each out and got them to fit pretty well together. They are not level or perfectly lined up, but for a temporary garden they do the trick.
Here are the final results:
Here’s a better map of the garden: I am really looking forward to cooking this summer in our new kitchen, complete will all the fresh herbs we need. I have a nice sunburn from this project, but overall it just took a couple hours to complete! It’s an easy weekend project that anyone can do.
